HashiCorp Nomad and Vault with .NET: ASP.NET Core in a Secure Workload
When we published our HashiCorp Nomad and Vault: Dynamic Secrets post, the demo ran exclusively as a Python Flask application. Since then, the repository has

Amazon Elastic Kubernetes Service (Amazon EKS) is a managed service on AWS that eliminates the need for manual installation and maintenance of a Kubernetes control plane and nodes. It ensures high availability by running and scaling the control plane across multiple AWS Availability Zones. The service automatically handles control plane instance scaling, replacement of unhealthy instances, and provides version updates and patching. Amazon EKS integrates with various AWS services, including Amazon ECR, Elastic Load Balancing, IAM, and Amazon VPC, for scalability and security. It supports the use of existing Kubernetes plugins and tooling, allowing seamless migration of applications without code modification. Applications on Amazon EKS are compatible with standard Kubernetes environments, regardless of the infrastructure.
As a developer, I constantly look for opportunities to automate and streamline my deployments.
Setting up an Amazon EKS cluster with automated configurations empowers you to effortlessly manage containerized applications with scalability and security. By automating essential components like External DNS and load balancing, you can focus on innovation and rapid development, unlocking the full potential of your applications in a resilient and efficient Kubernetes environment.
In this post I want to show you, how you can setup an Amazon EKS cluster and configures External DNS and the AWS Load Balancer Controller to enable DNS management and load balancing functionality within the cluster.
The AWS Load Balancer Controller simplifies the management of AWS Elastic Load Balancers within a Kubernetes cluster. It provisions AWS Application Load Balancers (ALBs) for Kubernetes Ingress and AWS Network Load Balancers (NLBs) for LoadBalancer-type services.
External DNS for EKS is a tool that automates the management of DNS records for resources running in an Amazon Elastic Kubernetes Service (EKS) cluster. It allows you to define DNS records for Kubernetes services and Ingress resources and automatically creates or updates DNS records in a specified DNS provider (e.g., AWS Route 53) based on changes in the cluster.
You will need five things:
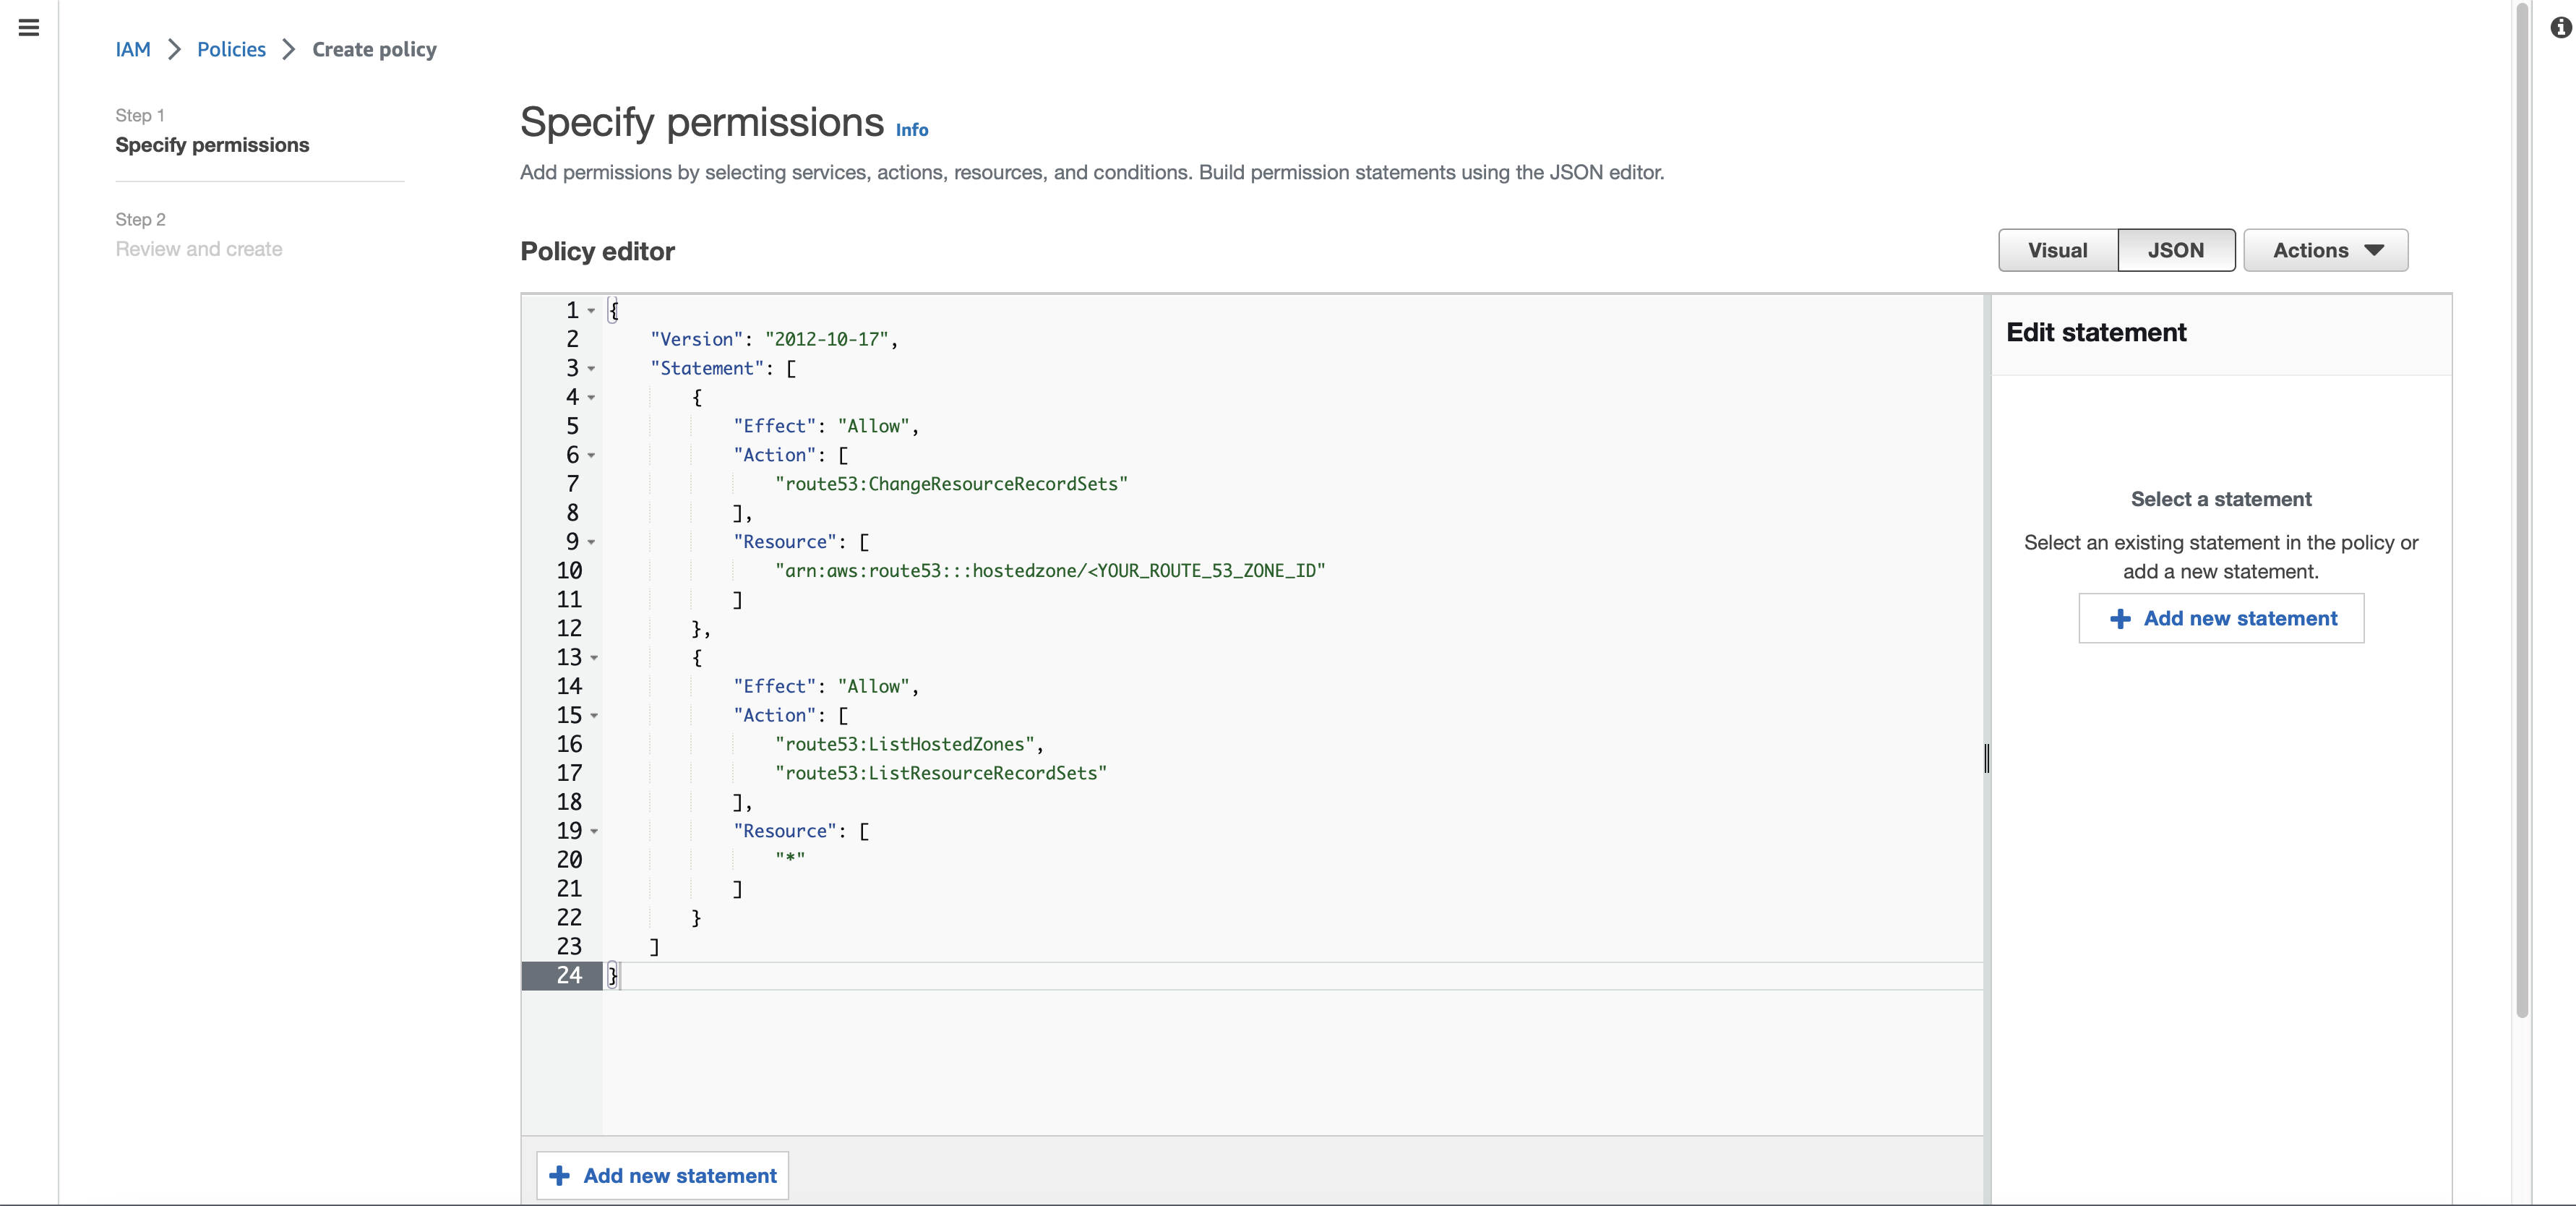
kubernetes.io/cluster/<YOUR_CLUSTER_NAME> = sharedkubernetes.io/role/elb = 1In order for External DNS and ALB to be able to do their work, they will need some permissions in AWS. Luckily for us its easy to create those. Simply copy the following permission and create a policy called AllowExternalDNSUpdates and don't forget to change <YOUR_ROUTE_53_ZONE_ID> to the hosted zone ID of your DNS-Zone in Route 53:
 1{
 2    "Version": "2012-10-17",
 3    "Statement": [
 4        {
 5            "Effect": "Allow",
 6            "Action": [
 7                "route53:ChangeResourceRecordSets"
 8            ],
 9            "Resource": [
10                "arn:aws:route53:::hostedzone/<YOUR_ROUTE_53_ZONE_ID>"
11            ]
12        },
13        {
14            "Effect": "Allow",
15            "Action": [
16                "route53:ListHostedZones",
17                "route53:ListResourceRecordSets"
18            ],
19            "Resource": [
20                "*"
21            ]
22        }
23    ]
24}
Now the only policy we are missing, is the AWSLoadBalancerControllerIAMPolicy. You can get and create the policy by executing the following commands in the AWS-CLI:
1$ curl -O https://raw.githubusercontent.com/kubernetes-sigs/aws-load-balancer-controller/v2.4.7/docs/install/iam_policy.json
2
3$ aws iam create-policy \
4    --policy-name AWSLoadBalancerControllerIAMPolicy \
5    --policy-document file://iam_policy.json
Now that we have our policies, all that's left is setting up our EKS-Cluster and executing a single script to get everything ready for your deployments.

AWS will guide you through the creation of your cluster, but make sure to create the cluster as a public cluster, which will make the setup way easier.
After the cluster creation finished, select the cluster and switch to the Compute tap and continue to create a Node group.

Once everything is ready, its time to execute our script on the AWS-CLI of the same account that created the cluster and simply wait for it to finish! Don't forget to change the variables CLUSTER_NAME, REGION and NAMESPACE to the correct values for your use case.
  1#!/bin/bash
  2set -e
  3
  4# Sets up variables for the cluster name, region, namespace and account ID.
  5CLUSTER_NAME=mycluster
  6REGION=eu-central-1
  7NAMESPACE=demo
  8ACCOUNT_ID=$(aws sts get-caller-identity | python3 -c "import sys,json; print (json.load(sys.stdin)['Account'])")
  9
 10# Updates the kubeconfig for the specified EKS cluster.
 11aws eks --region $REGION update-kubeconfig --name $CLUSTER_NAME
 12
 13# Installs OpenSSL, downloads Helm 3, and makes it executable.
 14sudo yum install openssl -y
 15curl https://raw.githubusercontent.com/helm/helm/master/scripts/get-helm-3 > get_helm.sh
 16chmod 700 get_helm.sh
 17./get_helm.sh
 18
 19# Creates a Kubernetes namespace.
 20kubectl create namespace $NAMESPACE
 21
 22# for ARM systems, set ARCH to: `arm64`, `armv6` or `armv7`
 23ARCH=amd64
 24PLATFORM=$(uname -s)_$ARCH
 25
 26# Downloads and extracts the eksctl utility.
 27curl -sLO "https://github.com/weaveworks/eksctl/releases/latest/download/eksctl_$PLATFORM.tar.gz"
 28
 29# (Optional) Verify checksum
 30curl -sL "https://github.com/weaveworks/eksctl/releases/latest/download/eksctl_checksums.txt" | grep $PLATFORM | sha256sum --check
 31
 32tar -xzf eksctl_$PLATFORM.tar.gz -C /tmp && rm eksctl_$PLATFORM.tar.gz
 33
 34sudo mv /tmp/eksctl /usr/local/bin
 35
 36# Associates the IAM OIDC provider with the EKS cluster.
 37eksctl utils associate-iam-oidc-provider \
 38    --region=$REGION \
 39    --cluster=$CLUSTER_NAME \
 40    --approve
 41
 42# Creates IAM service accounts for external-dns and aws-load-balancer-controller, attaching the appropriate IAM policies.
 43eksctl create iamserviceaccount \
 44    --name external-dns \
 45    --cluster $CLUSTER_NAME \
 46    --attach-policy-arn arn:aws:iam::$ACCOUNT_ID:policy/AllowExternalDNSUpdates \
 47    --approve \
 48    --override-existing-serviceaccounts \
 49    --namespace $NAMESPACE
 50
 51eksctl create iamserviceaccount \
 52    --name aws-load-balancer-controller \
 53    --cluster $CLUSTER_NAME \
 54    --attach-policy-arn arn:aws:iam::$ACCOUNT_ID:policy/AWSLoadBalancerControllerIAMPolicy \
 55    --region $REGION \
 56    --approve \
 57    --override-existing-serviceaccounts \
 58    --namespace=kube-system
 59
 60# Adds the EKS Helm repository and updates the repositories.
 61helm repo add eks https://aws.github.io/eks-charts
 62helm repo update eks
 63
 64# Installs the aws-load-balancer-controller using Helm, specifying the cluster name and service account details.
 65helm install aws-load-balancer-controller eks/aws-load-balancer-controller \
 66  -n kube-system \
 67  --set clusterName=$CLUSTER_NAME \
 68  --set serviceAccount.create=false \
 69  --set serviceAccount.name=aws-load-balancer-controller
 70
 71# Applies Kubernetes resources (ClusterRole, ClusterRoleBinding, and Deployment) for external-dns.
 72# Configures the external-dns Deployment with necessary parameters, including the domain filter, AWS provider, and AWS zone type.
 73kubectl apply -f - <<EOF
 74apiVersion: rbac.authorization.k8s.io/v1
 75kind: ClusterRole
 76metadata:
 77  name: external-dns
 78  namespace: $NAMESPACE
 79rules:
 80- apiGroups: [""]
 81  resources: ["services"]
 82  verbs: ["get","watch","list"]
 83- apiGroups: [""]
 84  resources: ["pods"]
 85  verbs: ["get","watch","list"]
 86- apiGroups: ["networking","networking.k8s.io"]
 87  resources: ["ingresses"]
 88  verbs: ["get","watch","list"]
 89- apiGroups: [""]
 90  resources: ["nodes"]
 91  verbs: ["get","watch","list"]
 92- apiGroups: [""]
 93  resources: ["endpoints"]
 94  verbs: ["get","watch","list"]
 95---
 96apiVersion: rbac.authorization.k8s.io/v1
 97kind: ClusterRoleBinding
 98metadata:
 99  name: external-dns-viewer
100  namespace: $NAMESPACE
101roleRef:
102  apiGroup: rbac.authorization.k8s.io
103  kind: ClusterRole
104  name: external-dns
105subjects:
106- kind: ServiceAccount
107  name: external-dns
108  namespace: wherebear
109---
110apiVersion: apps/v1
111kind: Deployment
112metadata:
113  name: external-dns
114  namespace: $NAMESPACE
115spec:
116  strategy:
117    type: Recreate
118  selector:
119    matchLabels:
120      app: external-dns
121  template:
122    metadata:
123      labels:
124        app: external-dns
125    spec:
126      serviceAccountName: external-dns
127      containers:
128      - name: external-dns
129        image: k8s.gcr.io/external-dns/external-dns:v0.13.4
130        args:
131        - --source=service
132        - --source=ingress
133        - --domain-filter=wherebear.app # will make ExternalDNS see only the hosted zones matching provided domain, omit to process all available hosted zones
134        - --provider=aws
135        #- --policy=upsert-only # would prevent ExternalDNS from deleting any records, omit to enable full synchronization
136        - --aws-zone-type=public # only look at public hosted zones (valid values are public, private or no value for both)
137        - --registry=txt
138        - --txt-owner-id=wherebear-eks-cluster-external-dns
139      securityContext:
140        fsGroup: 65534 # For ExternalDNS to be able to read Kubernetes and AWS token files
141EOF
Now you can deploy your application and access it at your desired domain name, by setting the ingress for whatever deployment you have to the following. Please take note to change the domain name, the certificate ARN, the name of your service, the namespace and name of your ingress according to your requirements:
 1apiVersion: networking.k8s.io/v1
 2kind: Ingress
 3metadata:
 4  name: "<NAME_OF_INGRESS>"
 5  namespace: "<NAMESPACE>"
 6  annotations:
 7    # Below annotation is to specify if the loadbalancer is "internal" or "internet-facing"
 8    alb.ingress.kubernetes.io/scheme: internet-facing
 9    # TODO: Fill in with the ARN of your certificate.
10    alb.ingress.kubernetes.io/certificate-arn: <YOUR_CERTIFICATE_ARN>
11    # TODO: Fill in the listening ports.
12    alb.ingress.kubernetes.io/listen-ports: '[{"HTTP": 80}, {"HTTPS":443}]'
13    # Set HTTP to HTTPS redirects. Every HTTP listener configured will be redirected to below mentioned port over HTTPS.
14    alb.ingress.kubernetes.io/ssl-redirect: '443'
15    alb.ingress.kubernetes.io/target-type: ip
16    external-dns.alpha.kubernetes.io/hostname: www.example.com
17spec:
18  ingressClassName: alb
19  rules:
20    - http:
21        paths:
22          - path: /
23            pathType: Prefix
24            backend:
25              service:
26                name: "<SERVICE_NAME>"
27                port:
28                  number: 80
If you wish to delete your cluster and clean up the created resources, you can do so by running the following script on the AWS-CLI and delete the cluster afterwards:
 1#!/bin/bash
 2set -e
 3
 4CLUSTER_NAME=mycluster
 5REGION=eu-central-1
 6NAMESPACE=demo
 7ACCOUNT_ID=$(aws sts get-caller-identity | python3 -c "import sys,json; print (json.load(sys.stdin)['Account'])")
 8
 9eksctl delete iamserviceaccount \
10    --name external-dns \
11    --cluster $CLUSTER_NAME \
12    --namespace $NAMESPACE
13
14eksctl delete iamserviceaccount \
15    --name aws-load-balancer-controller \
16    --cluster $CLUSTER_NAME \
17    --namespace kube-system
18
19aws iam list-open-id-connect-providers
20ACCOUNT_ID=$(aws sts get-caller-identity | python3 -c "import sys,json; print (json.load(sys.stdin)['Account'])")
21echo $ACCOUNT_ID
22
23OIDCURL=$(aws eks describe-cluster --name $CLUSTER_NAME --region $REGION --query "cluster.identity.oidc.issuer" --output text  | python3 -c "import sys; print (sys.stdin.readline().replace('https://',''))")
24echo $OIDCURL
25aws iam delete-open-id-connect-provider --open-id-connect-provider-arn arn:aws:iam::$ACCOUNT_ID:oidc-provider/$OIDCURL
26aws iam list-open-id-connect-providers
Finally make sure to check if the load balancers have been deleted. If not make sure to delete them manually. Or if your VPC is tagged you can execute the following script:
 1#!/bin/bash
 2set -e
 3
 4vpc_id=$(aws ec2 describe-vpcs --filters "Name=tag:Name,Values=<YOUR_TAG_VALUE>" --query 'Vpcs[0].VpcId' --output text)
 5load_balancer_arns=$(aws elbv2 describe-load-balancers --query 'LoadBalancers[?VpcId==`'"$vpc_id"'`].LoadBalancerArn' --output text)
 6for arn in $load_balancer_arns; do
 7  aws elbv2 delete-load-balancer --load-balancer-arn $arn
 8done
 9
10security_group_ids=$(aws ec2 describe-security-groups --filters "Name=vpc-id,Values=$vpc_id" --query 'SecurityGroups[?starts_with(GroupName, `k8s-`)].GroupId' --output text)
11
12for sg_id in $security_group_ids; do
13  aws ec2 delete-security-group --group-id $sg_id
14done
To summaries what we relearned in in this post:
alb.ingress.kubernetes.io and external-dns.alpha.kubernetes.io, provide additional configuration options for load balancers, SSL termination, and DNS mappings.Dive into the world of DevOps, Source Control Management, CI/CD and Containers.
Introduction to modern infrastructure provisioning.
This is an introduction to Kubernetes, an open-source system for automating deployment, scaling, and management of containerized applications.
When we published our HashiCorp Nomad and Vault: Dynamic Secrets post, the demo ran exclusively as a Python Flask application. Since then, the repository has
2,500 API endpoints. Expose every one of them as an MCP tool and you get, according to Cloudflare, 1.17 million tokens for tool definitions alone, before the
Every Nomad tutorial you will find online uses the docker driver. That makes sense — containers are portable, images bundle everything, and Docker is
In our previous post about HashiCorp Nomad and Vault: Dynamic Secrets we walked through the full lifecycle of secrets management for a Python Flask application
Over the last two weeks we introduced three mesh VPN solutions one at a time: NetBird, Tailscale, and Headscale. Three posts, three products, one open question:
You are interested in our courses or you simply have a question that needs answering? You can contact us at anytime! We will do our best to answer all your questions.
Contact us